

hhhhhhhhhhhh该笔记持续更新,仅更新自用部分,如有错误请在评论区指正,谢谢🙏
首次博客更新2025-12-29
类型注解
- 给变量加类型注解
name: str = "Tom"age: int = 18price: float = 3.14flag: bool = True列表,字典:
nums: list[int] = [1, 2, 3]names: list[str] = ["a", "b"]
info: dict[str, int] = {"Tom": 18}- 返回值注解
def add(a: int, b: int) -> int: return a + bLiteral注解
from typing import Literalstatus: Literal["success", "fail", "pending"]Optional注解
from typing import Optional
def get_name() -> Optional[str]: return NoneAny
from typing import Any
data: Any = 123data = "abc"data = []Callable
Callable[[参数类型列表], 返回类型]示例:
from typing import Callable
def apply(f: Callable[[int, int], int], a: int, b: int) -> int: return f(a, b)虚拟环境
python -m venv .venv基本语法
input返回str类型
name = input("请输入你的名字:")print("你好," + name)类型转换
int("666")print("知道了,你今年" + str(2) + "岁了!")条件控制
mood_index = int(input("Enter mood index: "))if mood_index >= 60: print("congratulation!")elif 30 <mood_index < 60: print("Nromal.")else: print("Sorry.")布尔类型
唯一实例
唯一实例:True 和 False 是 全局唯一的单例对象
a = Trueb = Trueprint(a is b) # True
x = Falsey = Falseprint(x is y) # True不可变
一旦创建,不能修改它的值:
a = True# a[0] = False # ❌ TypeError切片
用法:序列[start : stop : step]
含义:从 start 开始,到 end 结束(不包含 end),步长为 step
step为负数(反向切片):
a = [0,1,2,3,4]
print(a[::-1])[4,3,2,1,0]列表
shopping_list = ["apple", "banana", "cherry"]shopping_list.append("orange")print(shopping_list[0])
price = [100,200,301,129]max_price = max(price)min_price = min(price)sorted_price = sorted(price)print(max_price)print(min_price)print(sorted_price)- 方法:
对象.方法名(…)
- 函数:
函数名.(对象)
列表的基操方法:
append()——末尾添加一个元素extend()——添加多个元素( 参数必须是可迭代对象)insert(a,b)——指定位置插入
a = [1, 2, 3]a.insert(1, 100)print(a) # [1, 100, 2, 3]插入会导致后续元素整体右移,效率较低。
remove()——按值删除pop()——按下标删除并返回( 不写参数默认删除最后一个: )
a = [1, 2, 3]x = a.pop(1)print(x) # 2print(a) # [1, 3]clear()——清空列表reverse()—— 逆向输出copy()—— 列表的拷贝a.sort(reverse=True)—— (默认升序)列表排列
函数:
sorted(words, key=len, reverse=False)——返回新列表的排序enumerate(可迭代对象, start=0)
示例:
lst = ['a', 'b', 'c']
for i, v in enumerate(lst): print(i, v)输出:
0 a1 b2 c列表生成式
[ 表达式 for 变量 in 可迭代对象 ]
map函数
map(function, iterable)把一个函数“批量作用”到可迭代对象的每个元素上,map返回的是迭代器
例:
nums = [1, 2, 3, 4]
res = map(lambda x: x * 2, nums)print(list(res))相当于
[x * 2 for x in nums]元组
在 Python 里,用逗号分隔的多个值会被自动打包成一个元组,即使没有外面的圆括号。
使用内置函数创建元组:tuple()
遍历输出元组元素:
print(len(t))for i in range(len(t)): print(i,t[i])删除元组:del 元组名
字典
contacts = { ("xioamin",23):"111111111", ("xiaohua",24):"222222222"}del contacts[("xioamin",23)]contacts[("xiaomei",24)] = "123131"print(contacts)print(len(contacts))- 访问字典:
- 使用
[]访问
- 使用
student_grades = { "语文": 90, "数学": 95, "英语": 88, "科学": 92}# 访问 '数学' 键对应的值math_score = student_grades["数学"]print(math_score) # 输出: 952. 使用`.get(key, default=None)` 方法 (`default`为键不存在时返回的默认值)items()方法:**无参数,**返回 返回字典中所有键值对组成的可迭代视图,每个元素是(key, value)元组 ,可以用list()转换成列表- 字典的遍历:拆开键和值
for k, v in d.items(): print(k, v)pop()用于 删除字典中的某个键,并返回对应的值。popitem()——随机删除clear()——清空字典中所有元素dict.update([other])other:可选参数,可以是另一个字典、可迭代的键值对,或关键字参数。返回 None,原地修改调用字典。
字典生成式
d={key:value for item in range}d-{key:value for key,value in zip(lst1,lst2)}
集合
集合(set)是一种“无序、不重复”的数据结构,用来存储一组唯一的元素。 (不能存储字典和列表)
创建方式:
- 使用花括号
{} - 使用
set()函数——s=set(可迭代对象)
删除:del 集合对象
集合操作符:
| 操作符 | 含义 | 示例 | 结果 |
|---|---|---|---|
| ` | ` | 并集 | `{1,2} |
& | 交集 | {1,2} & {2,3} | {2} |
- | 差集 | {1,2} - {2,3} | {1} |
^ | 交集的补集 | {1,2} ^ {2,3} | {1,3} |
<= | 子集 | {1} <= {1,2} | True |
< | 真子集 | {1} < {1,2} | True |
>= | 超集 | {1,2} >= {1} | True |
> | 真超集 | {1,2} > {1} | True |
集合操作方法:
s.add(x)——如果x不在s集合中,添加到s集合中
s.remove(x)——将集合s中x删除
s.clear()——清空集合中所有元素
结构模型匹配
match data: case pattern1: ... case pattern2: ...match data: case {}: print("空字典") case []: print("空列表") case (): print("空元组") case _: print("其他情况")多值匹配:
match data1, data2: case 1, 2: print("data1=1, data2=2")异常处理
try: xxx() #自定义函数
except Exception as e: #不写默认为Exception print("输入错误") raise #层层向上报错
finally中抛出的异常会覆盖try中的异常
except后接异常类型
BaseException ├── SystemExit ├── KeyboardInterrupt └── Exception ├── TypeError #类型不对 ├── ValueError #值不合法 ├── IndexError #下标越界 ├── KeyError #字典没这个键 └── FileNotFoundError #文件不存在** 同时捕获多个异常** :
try: x = int(input())except (ValueError, TypeError): print("输入不合法")- 用 元组
- 只要命中其中一个就进
except
try: 代码except 异常类型: 处理else: 没有异常执行finally: 一定执行字符串
方法
- 大小写转换
s = "PyThOn"
s.lower() # 'python's.upper() # 'PYTHON's.title() # 'Python's.capitalize() # 'Python'- 去除空白
s = " hello "
s.strip() # 'hello's.lstrip() # 'hello 's.rstrip() # ' hello'split拆分字符串 **字符串 → 列表 **
s = "1001-苹果-10"
parts = s.split("-")print(parts)join进行拼接
"分隔符".join(可迭代对象)示例:
words = ["Python", "is", "fun"]result = " ".join(words) # 空格分隔print(result)find()检索字符首次出现的位置(从0开始),不存在返回-1index()检索字符首次出现的位置(从0开始),不存在则报错count()replace(_old,_new,_count)方法,将old字符串替换成new,替换次数为count(默认全部替换)str.center(width[, fillchar])方法, 把字符串放到指定宽度中间,不够的地方用指定字符填充。eval函数去掉最外层的引号,可变为整型repr(obj)函数, 和str()不同,repr()会把“看不见的字符”显示出来
格式化字符串
%格式
name = "Alice"age = 20height = 1.68
# 字符串和整数print("我叫%s,今年%d岁" % (name, age))
# 浮点数保留两位小数print("我的身高是%.2f米" % height)str.format()
name = "Alice"age = 20height = 1.6789
# 按顺序填充print("我叫{},今年{}岁".format(name, age))
# 使用关键字print("我叫{name},身高{h:.2f}米".format(name=name, h=height))
# 指定位置print("名字:{0}, 年龄:{1}, 再次打印名字:{0}".format(name, age))s="helloworld"print('{0:*<20}'.format(s)) #左对齐print('{0:*>20}'.format(s)) #右对齐print('{0:*^20}'.format(s)) #居中对齐
#print(s.center(20,'*'))f-string
字符串的编码和解码
- 编码 encode:
str → bytes,解码 decode:bytes → str
s='你好世界'scode=s.encode(encoding='utf-8')scode2=scode.decode(encoding='utf-8')print(scode)print(scode2)数据的验证
| 方法 | 作用 |
|---|---|
.isdigit() | 判断字符串是否只包含数字 |
.isalpha() | 判断是否只包含字母 |
.isalnum() | 判断是否只包含字母和数字 |
.isspace() | 判断是否只包含空格 |
.startswith()/ .endswith() | 判断开头或结尾 |
enumerate()函数
enumerate(iterable, start=0)iterable:可迭代对象(列表、字符串、元组等)start:索引起始值,默认是0- eg:将
[a, b, c]变成(0, a), (1, b), (2, c)
深拷贝和浅拷贝
浅拷贝: 创建一个容器,容器里的元素地址不变
import copy
lst1 = [1, 2, [3, 4]]
lst2 = lst1.copy() # 方法一lst3 = lst1[:] # 方法二lst4 = copy.copy(lst1) # 方法三深拷贝 : 创建一个**完全独立的新对象, 所有层级都复制 **
import copy
lst1 = [1, 2, [3, 4]]lst2 = copy.deepcopy(lst1)推导式
推导式(Comprehension) 是一种用更简洁、更优雅的语法来生成列表、字典、集合或生成器的方式。
推导式 = 简洁版的 for 循环 + 条件判断,用来构建新的数据结构。
例如:
nums= [1,2,3,4,5,6]my_list = [i for i in nums]- 第一个
i表示为需要添加到新列表中的元素,改为i**2则为i的平方添加到my_list
函数
参数类型(很重要也很实用)
- 普通参数
def f(a, b): ...- 默认参数
def greet(name="Nanzhi"): print("Hello", name)匿名函数
lambda arguments: expression
示例:
x = lambda a : a + 10print(x(5))- 可变参数(不定长)
- args — 接收多个位置参数
def sum_all(*nums): print(nums)nums 是一个元组。
- kwargs — 接收多个键值对参数
def info(**data): print(data)data 是一个字典。
lambda 参数1, 参数2, ...: 表达式f = lambda x: x + 1print(f(5)) # 6- 局部变量和全局变量
x = 10 # 全局变量
def foo(): y = 5 # 局部变量函数内部不能直接修改全局变量,除非用 global:
def foo(): global x x = 20函数也是“第一类对象”(很高级但很重要)
Python 中函数可以:
- 赋值给变量
- 当作参数传给函数
- 放进列表、字典
- 作为返回值返回
例子:
def hello(): print("Hi")
f = hellof() # 等价于 hello()内置函数
isinstance(object, classinfo):object:要检查的对象,classinfo:类型或类型元组(可以同时检查多种类型),返回值 :布尔值( True 或 False )
面向对象
- 类是模版,实例/对象是根据模板生成的具体东西,类定义属性和行为,对象拥有这些属性并能执行这些行为。
类定义写法 :
class 类名: # 类体(属性 + 方法) pass定义类属性 & 实例属性
class Student: school = "xxx_university" #类属性
def __init__(self,name): self.name = name #实例属性| 类型 | 属于谁 | 访问方式 |
|---|---|---|
| 类属性 | 类本身所有对象共享 | Person.species |
| 实例属性 | 每个对象独立持有 | p.name |
动态绑定属性:
a.gender = '男' #动态添加属性print(f"我是{a.gender}生")实例方法
定义在类中的函数,称为方法,自带一个参数self
实例方法如示例调用
def show(self,age): self.age = age print(f"我今年{se lf.age}岁了")
a=Student("xiaomin")a.show(18)静态方法
- 使用
@staticmethod修饰的方法,不需要self/cls属性 - 不能调用实例属性和实例方法
class Person: @staticmethod def test(): print("静态方法不能使用实例属性和实例方法")类方法
cls指向类本身
class MyClass: @classmethod def my_class_method(cls): print(cls)- 类方法可以通过 类或实例 修改类属性。
动态绑定方法:
a.func=introduce #函数的一个赋值#func是a对象的方法a.func() #调用创建类对象与调用
- 传入两个参数因为__init__方法中有两个形参,是自带的属性,无需手动传入
- 实例属性、类属性通过打点调用
- 实例方法使用对象名进行打点调用
- 静态方法、类方法使用类名打点调用
stu=Student('nz',18) #创建对象print(stu.name,stu.age) #调用实例属性print(Student.school) #调用类属性stu.show() #调用实例方法Student.sm() #调用静态方法Student.cm() #调用类方法权限控制
class Student(): def __init__(self,name,age,gender): self._name = name #self_name受保护,只能本类和子类访问 self.__age = age #self.__age表示私有的,只能类本身去访问 self.gender = gender #普通的实例属性
def _func1(self): #受保护的 print("子类及本身可以访问")
def __func2(self): #私有的 print("只有定义的类可以访问")
def show(self): #普通的实例方法 self._func1() #类本身访问受保护的方法 self.__func2() #类本身访问私有方法 print(self._name) #受保护的实例属性 print(self.__age) #私有实例属性
stu=Student("xiaomin",18,"男")stu.show()访问私有成员
示例:
class Person: def __init__(self): self.__age = 18
def __secret(self): print("这是秘密")
def get_age(self): return self.__age- 方法一:
p = Person()print(p.get_age())- 方法二(可行但不推荐)——名称重整:
__attr → _类名__attr- 访问私有属性:
print(p._Person__age) - 访问私有方法:
p._Person__secret()
属性的设置
@property
- **只读属性(getter) **
class Person: def __init__(self, age): self._age = age # 内部属性
@property def age(self): return self._age使用方式:
p = Person(18)print(p.age) # 看起来是属性#实际上执行 Person.age(p)- **可写属性(setter) **
class Person: def __init__(self, age): self._age = age
@property def age(self): return self._age
@age.setter #属性名.setter def age(self, value): if value < 0: raise ValueError("age must be non-negative") self._age = valuep.age = 20 # 自动调用 setter继承
它指的是定义一个新类,而对现有类的进行很少修改或没有修改。新类称为派生(或子)类,而从其继承的新类称为基(或父)类。
class Person: def __init__(self,name,age): self.name = name self.age = age def show(self): print(f"大家好,这里是{self.name},今年{self.age}")
#Student继承Person类class Student(Person): def __init__(self,name,age,id): super().__init__(name,age) #调用父类的初始化方法 self.id = id
#Doctor继承Person类class Doctor(Person): def __init__(self, name, age,department): super().__init__(name, age) self.department = department
#创建一个子类对象stu=Student("xiaomin",18,"1001")stu.show()
doctor=Doctor("zhangsan",30,"内科")doctor.show()多继承
class FatherA(): def __init__(self,name): self.name = name
def showA(self): print(f"我是父类A中的方法")
class FatherB(): def __init__(self,age): self.age = age
def showB(self): print(f"我是父类B中的方法")
#多继承class Son(FatherA,FatherB): def __init__(self,name,age,id): FatherA.__init__(self,name) #调用父类A的初始化方法 FatherB.__init__(self,age) #调用父类B的初始化方法 self.id = id
son=Son("xiaoming",18,"1001")son.showA()son.showB()方法重写
- 优先调用子类的方法
class Person: def __init__(self,name,age): self.name = name self.age = age def show(self): print(f"大家好,这里是{self.name},今年{self.age}")
#Student继承Person类class Student(Person): def __init__(self,name,age,id): super().__init__(name,age) #调用父类的初始化方法 self.id = id
def show(self): super().show() #调用父类中的方法 print(f"我的学号是{self.id}")
#Doctor继承Person类class Doctor(Person): def __init__(self, name, age,department): super().__init__(name, age) self.department = department
#创建一个子类对象stu=Student("xiaomin",18,"1001")stu.show()
doctor=Doctor("zhangsan",30,"内科")doctor.show()构造函数
- 构造函数(constructor)指的是类中的一个特殊方法,其基本形式为:
class Person: def __init__(self, name, age): self.name = name # 给对象绑定属性 self.age = age
p = Person("Tom", 20) # 自动调用 __init__class CuteCat: def __init__(self,cat_name,cat_age,cat_color): self.name = cat_name self.age = cat_age
cat1 = CuteCat("jojo", 12,"orange")print(f"{cat1.name} is {cat1.age} years old")构造函数的作用:
- ✔ 设置对象属性
self.name = name- ✔ 初始化对象状态
self.score = 0无参数构造函数示例 :
class Test: def __init__(self): print("构造函数被调用了")
t = Test()文件操作
上下文管理器
上下文管理器(Context Manager)就是一个能被 with 语句管理进入和退出过程的对象。
换句话说:
只要一个对象定义了
**__enter__**和**__exit__**方法,它就是上下文管理器。
class MyOpen: def __init__(self,filepath): print("Entering constructor of MyOpen") self.filepath = filepath
def __enter__(self): print("Ent ering __enter__ of MyOpen") return self.filepath
def __exit__(self,exc_type,exc_value,traceback): print("Entering __exit__ of MyOpen")
with MyOpen('data.txt') as file: print(f"the value of file is {file}")上下文管理器必须实现两个方法
__enter__(self):进入 with 块之前自动执行,返回值会赋给as后面的变量__exit__(self, exc_type, exc_val, exc_tb): 结束 with 块后自动执行,无论是否发生异常都会执行,可以决定要不要让异常继续向外抛出
with的执行流程:
1. 调用 obj = 表达式2. 调用 obj.__enter__()3. 执行 with 代码块4. 调用 obj.__exit__()文件读取
read:读取文件的全部内容readline():逐行读取readlines():读取所有行并存储为**列表 **
f = open("./data.txt","r",encoding="utf-8")print(f.read()) #内括号可以写入读取的字节数f = open("./data.txt","r",encoding="utf-8")lines = f.readlines()for line in lines: print(line)f.close() #关闭文件,释放资源- 使用
with关键字(with语句最典型的用途是处理那些需要在使用后明确释放或关闭的资源):with表达式as变量:
文件操作就是一个上下文管理器
# data.txt 在 with 块结束后,无论是否发生错误,都会自动调用 file.close() 方法with open('data.txt', 'r', encoding='utf-8') as file: content = file.read() print(content)
# 在 with 块外部,文件已经被安全关闭文件写入
- 写入模式 ‘
w’:如果文件存在,内容会被清空 - 使用’
a’参数打开,为附加模式 - 使用’
r+’参数,同时支持读写文件
with open('output.txt', 'w', encoding='utf-8') as f: # 写入第一行,必须手动添加换行符 f.write("这是写入文件的第一行。\n")
# 写入第二行 f.write("这是第二行内容。\n")# 'r+': 读写模式,指针在开头with open("./data.txt", "r+", encoding="utf-8") as f: f.write("hello!\n") # 写入,指针移动到写入内容的末尾 f.write("yoo") # 继续写入,指针移动到新的末尾
# --- 关键步骤 --- # 将文件指针移回文件开头 (位置 0) f.seek(0)
# 重新读取整个文件的内容 print(f.read())| 模式 | 含义 |
|---|---|
"r" | 只读(文本) |
"w" | 只写(文本,覆盖) |
"a" | 追加(文本) |
"rb" | 二进制读 |
"wb" | 二进制写 |
"ab" | 二进制追加 |
"r+" | 读写 |
打包与解包
单*
*(单个星号) 的作用 : 主要用于**序列(如列表、元组)**的打包和解包。
numbers = [1,2,3,4,5]first,*rest = numbersprint(first)print(rest)1[2, 3, 4, 5]打包成一个序列:
def print_values(*args): for arg in args: print(arg)
print_values(1,2,3,4)解包:
list1 =[1,2,3]tuple1 = (4,5,6)merged = [*list1,*tuple1]print(merged)# [1, 2, 3, 4, 5, 6]将person解包成Alice和30两个值:
def greet(name,age): print(f"hello{name},you are {age} years old")
person =('Alice',30)greet(*person)双**
**主要用于字典 (Dictionary) 的打包和解包。
打包:
def example(**kwargs): for key,value in kwargs.items(): print(f"{key}={value}")
example(a=1,b=2)解包(字典):
def create_profile(name,age,email): print(f"name : {name}") print(f"age : {age}") print(f"email : {email}")
option = { "name":"tony", "age":18, "email":"tony@qq.com"}
create_profile(**option)装饰器
- 修饰器本质上是一个以函数作为参数,并返回新函数的函数。
**装饰器的基本用法: **
def my_decorator(func): def wrapper(): print("Before function") func() print("After function") return wrapper
@my_decoratordef hello(): print("Hello!")
hello()输出:
Before functionHello!After functiondef hello(): ...设计模式
工厂模式
把“创建对象”的代码,集中放到一个地方管理
# 工厂模式class DatabaseConnection: def __init__(self,host,port,username,password): self.host = host self.port = port self.username = username self.password = password
def connect(self): return f'Connecting to database at {self.host}:{self.port} with username {self.username}'
def connection_factory(db_type): db_config ={ 'main':{ 'host': 'localhost', 'port': 3306, 'username': 'root', 'password':'password123' }, 'analytics':{ 'host': '192.168.1.1', 'port': 5432, 'username': 'admin', 'password':'pass3' }, 'cache':{ 'host': '10.0.0.1', 'port': 27017, 'username': 'cacher', 'password':'cipher' } } return DatabaseConnection(**db_config[db_type]) #字典解包
def client(): main_db = connection_factory('main') analytics_db = connection_factory('analytics') cache_db = connection_factory('cache')
print(main_db.connect()) print(analytics_db.connect()) print(cache_db.connect())
client()单例模式
class DatabaseConnection: _instance = None
def __new__(cls,*args,**kwargs) -> Self: if cls._instance is None: cls._instance = super().__new__(cls) return cls._instance模块
导入自己写的模块
- 在同一目录下,以下为目录模板:
project/ main.py moduleA.pymoduleA.py内容:
def hello(): print("Hello from module!")main.py 中 :
import moduleA
mytool.hello()- 在不同目录下,
__init__.py的用法:
my_package/ __init__.py util.pyimport my_package相当于导入了
__init__.py
__init__.py的使用:
- 包的初始化
- 管理包接口
相对导入
- 相对导入的符号:
| 写法 | 含义 |
|---|---|
. | 当前包(current package) |
.. | 上一级目录(parent package) |
... | 上上级目录(grandparent package) |
示例目录结构
project/ packageA/ __init__.py a.py b.py sub/ __init__.py c.py- 同级目录导入:
from . import# from .a import func_a 导入a某个函数不写点 Python 会从项目根路径开始查找
a模块,而不是同级目录。from package.a import func_a = from .a import func_a
非同级目录的导入
from packageA.a import x的过程
路径 packageA.a 其实是:
packageA ← 一个包(必须先被加载)packageA.a ← 包里的模块所以导入 packageA.a 的过程是:
import packageAimport packageA.a魔术方法
<font style="color:rgb(15, 17, 21);background-color:rgb(235, 238, 242);">__all__</font> 是一个模块级别的变量(通常是一个字符串列表),用于定义当客户端代码使用 <font style="color:rgb(15, 17, 21);background-color:rgb(235, 238, 242);">from module import *</font> 时,哪些名称会被导入到当前命名空间。
__all__ = ['public_func', 'PublicClass']
def public_func(): return "I'm public!"
def _private_func(): return "I'm private (by convention)!"
class PublicClass: pass
class _PrivateClass: passjson的基础使用和操作
- 将
json导出至文件
import json
user = {}user['name'] = input('请输入姓名')user['age'] = int(input('请输入年龄'))
contents = json.dumps(user) #字典 -> 字符串
with open("user_info.json", "r+", encoding="utf-8") as f: f.write(contents)- 读取
json文件
import json
with open("./user_info.json","r",encoding="utf-8") as f: contents = f.read() user = json.loads(contents) # 字典 <- 字符串
print(f'欢迎回来{user['name']}')迭代器和生成器
for循环原理:
it =iter(my_str) #my_str.__iter__(),my_str为可迭代对象,it为迭代器while True: try: print(next(it)) #调用迭代器的next方法 except StopIteration: #无法获取迭代器的下一个值 break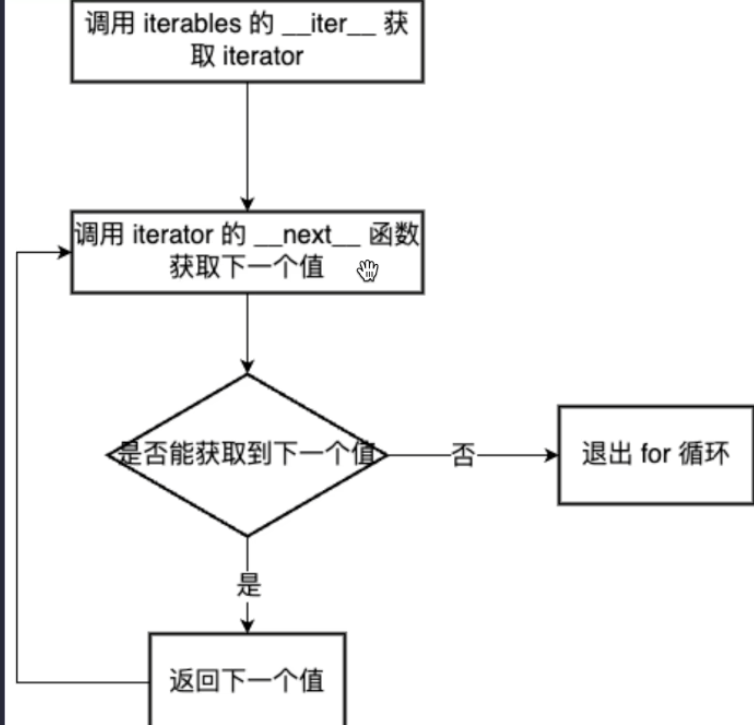
示例:
class MyNumbers: def __init__(self): self.num = 1
def __iter__(self): return self #获取迭代器自己
def __next__(self): if self.num <= 3: x = self.num self.num += 1 return x else: raise StopIteration生成器函数
函数里只要出现 yield,这个函数就变成 生成器函数。
def generator(n): for i in range(n): print('before yield') yield i print("after yield")
gen = generator(3) #gen 为生成器print(next(gen)) #生成0后退 出生成器函数print("---")for i in gen: print(i)before yield0---after yieldbefore yield1after yieldbefore yield2after yield柯里化
- 把一个接受多个参数的函数,变成一系列只接受一个参数的函数。
柯里化后函数
def add(a): def inner(b): return a + b return inner执行:
add(3) → 返回 inner 函数,相当于固定a的值inner(5) → 计算 3 + 5functools.partial(func, 参数1, 参数2, ...):
示例:
from functools import partial
def multiply(a, b): return a * b
double = partial(multiply, 2)
print(double(5))多线程
from time import sleep,timefrom threading import Thread
start_time = time()
def dnownload_img(url): sleep(1) print(f'{url} download complete')线程池:
from decimal import MAX_EMAXfrom time import time,sleepfrom concurrent import futures #线程池
start_time = time()
def download_img(url): sleep(1) return (f'{url} download complete')
with futures.ThreadPoolExecutor(max_workers=10) as excutor: results = excutor.map(download_img,range(10)) #range(10)作为download_img的参数 for result in results: print(result)- **守护线程(daemon=True):**主线程一结束,**不管它干没干完,直接结束;**不会影响程序退出
枚举
- 定义枚举
import enum
class ChapterResult(enum.Enum): SUCCESS = 0 ERROR = 1 NOT_OPEN = 2 PENDING = 3- 使用枚举
result = ChapterResult.SUCCESS- 属性
| 属性 | 含义 | 示例 |
|---|---|---|
result.name | 枚举成员名 | "ERROR" |
result.value | 实际存储的值 | 1 |
遍历查看member:
from enum import Enum
class Color(Enum): RED = 1 GREEN = 2 BLUE = 3
for c in Color: print(c.name,c.value)
enum和bool一样,也具有唯一实例性和不可变
数据解析
正则表达式
| 元字符 | 含义 |
|---|---|
. | 匹配任意 一个 字符(除换行) |
\d | 数字 [0-9] |
\D | 非数字 |
\w | 字母、数字、下划线 |
\W | 非字母数字下划线 |
\s | 空白字符(空格、\t、 \n) |
\S | 非空白字符 |
| ` | ` |
[...] | 匹配字符组中的字符 |
[^...] | 除了字符组里的内容 |
| 限定符(控制前面原字符出现的次数) | 含义 |
|---|---|
* | 0 次或多次 |
+ | 1 次或多次 |
? | 0 次或 1 次 |
{n} | 恰好 n 次 |
{n, } | 至少 n 次 |
{n,m} | n 到 m 次 |
^从开头开始匹配,$结尾匹配
贪婪匹配和惰性匹配
.* 贪婪匹配(尽可能多地匹配结果).*? 惰性匹配(尽可能少地匹配结果 -> 回溯)re模块
re.match(pattern, string)—— 只在字符串“开头”尝试匹配
示例:
import re
text = "123abc"
m = re.match(r"\d+", text)print(m.group()) # 123re.search(pattern, string)—— 在整个字符串中查找第一个匹配结果
示例:
text = "abc123def456"
m = re.search(r"\d+", text)print(m.group()) #从匹配到的结果拿数据# 123re.findall(pattern, string)—— 返回所有匹配结果的列表
示例(注意有无分组):
re.findall(r"(\d+)", text)# ['123', '456', '789']re.findall(r"(\d+)([a-z]+)", "123abc456def")# [('123', 'abc'), ('456', 'def')]re.finditer返回的是迭代器re.sub(pattern, repl, string)
示例:
text = "电话:123-456-789"
new = re.sub(r"\d", "*", text)print(new)# 电话:***-***-***re.split(pattern, string)—— 按正则规则切字符串
示例:
text = "apple,banana;orange|grape"
parts = re.split(r"[,;|]", text)print(parts)# ['apple', 'banana', 'orange', 'grape']- 预加载,提前把正则对象加载完毕:
obj = re.compile(r"\d+")for item in x: obj.finditer(item)obj = re.compile(r"\d+")#直接把加载好的正则使用result = obj.findall(text)分组:
- 普通分组
(\d+)- 自动编号:1、2、3……;用
group(1)、group(2)取
import re
m = re.search(r"(\d+)-(\w+)", "123-abc")print(m.group(1)) # 123print(m.group(2)) # abc- 命名分组
(?P<name>\w+)示例:
m = re.search(r"(?P<year>\d{4})-(?P<month>\d{2})", "2026-02")print(m.group("year")) # 2026print(m.group("month")) # 02import re
s="""<div class='西游记'><span id='10010'>中国联通</span></div><div class='西游记'><span id='10086'>中国移动</span></div>"""
obj =re.compile(r"<span id='(?P<id>\d+)'>(?P<name>.*?)</span>")result =obj.finditer(s)for item in result: id = item.group("id") print(id)
name=item.group("name") print(name)time模块
time提供的是偏底层、面向系统时间的功能。
常用函数:
time.time()—— 当前时间戳time.localtime([sec])—— 本地时间结构
time.struct_time( tm_year, # 年 tm_mon, # 月 (1-12) tm_mday, # 日 (1-31) tm_hour, # 时 (0-23) tm_min, # 分 (0-59) tm_sec, # 秒 (0-61) tm_wday, # 星期 (0=周一) tm_yday, # 一年中的第几天 tm_isdst # 是否夏令时)time.ctime()——返回当前时间戳的字符串表示time.strftime()—— 时间 → 字符串
now = time.localtime()s = time.strftime("%Y-%m-%d %H:%M:%S", now)print(s)输出
2025-12-24 21:30:00常用格式符:
| 格式 | 含义 |
|---|---|
%Y | 年 |
%m | 月 |
%d | 日 |
%H | 时 |
%M | 分 |
%S | 秒 |
time.strptime()—— 字符串 → 时间 , 返回struct_time
t = time.strptime("2025-12-24 21:30:00", "%Y-%m-%d %H:%M:%S")loguru库
- 安装:
pip install loguru
快速入门
- 严重程度逐渐增加
| 级别 | 描述 |
|---|---|
| TRACE | 最详细的日志,调试级别 |
| DEBUG | 调试信息 |
| INFO | 普通信息 |
| SUCCESS | 成功信息 |
| WARNING | 警告 |
| ERROR | 错误 |
| CRITICAL | 严重错误,程序可能无法继续 |
from loguru import logger
logger.debug("调试信息")logger.info("普通信息")logger.warning("警告信息")logger.error("错误信息")logger.critical("严重错误")
add方法
logger.remove() #移除了 loguru 的所有默认 sinklogger.add("file.log", rotation="5 MB", retention="10 days", level="INFO")参数解释:
rotation→ 日志文件达到多少大小或时间就切分retention→ 保留多长时间的日志level→ 最低记录级别
tqdm库
tqdm是 Python 中非常流行的 进度条库- 安装:
**pip install tqdm**
手动更新
pbar.update(n)表示在当前进度基础上增加 n 个 item
pbar = tqdm(total=100)pbar.update(10)sleep(2)pbar.update(20)sleep(2)pbar.update(70)pbar.close()使用with语句:
with tqdm(total=100) as pbar: pbar.update(10) sleep(2) pbar.update(20) sleep(2) pbar.update(70)write用法
- 功能:在进度条上方打印消息,不破坏 tqdm 进度条
tqdm.write(msg, file=sys.stdout, end='\n', nolock=False)参数:
| 参数 | 说明 |
|---|---|
| msg | 要打印的消息(字符串) |
| file | 输出流,默认 sys.stdout |
| end | 行尾符,默认 \n |
| nolock | 多线程/多进程环境下是否使用锁,默认 False(安全) |
argparse 模块
argparse是 Python 的解析命令行参数的标准库
命令行解析器
import argparseparser = argparse.ArgumentParser() #创建解析器parser
parser.add_argument("--name") #添加参数
args = parser.parse_args() #解析参数print(args.name)终端执行:
python test.py --name Tom输出:
Tomparser.parse_args()返回Namespace类,打点访问具体值
| 参数 | 作用 |
|---|---|
| name / —name | 参数名 |
| help | 帮助说明 |
| type | 类型 |
| default | 默认值 |
| required | 是否必填 |
| choices | 可选值 |
| action | 行为方式 |
- 位置参数:
import argparse
parser = argparse.ArgumentParser()parser.add_argument("filename") # 定义一个“位置参数”args = parser.parse_args()
print(args.filename)- 限定取值:
parser.add_argument("--mode", choices=["train", "test"])**action**参数:
默认行为:store 最常用:store_true store_false
count:统计出现次数
append:可以写多次 :
python main.py --tag A --tag B --tag C结果:
args.tag == ["A", "B", "C"]- 布尔开关参数
parser.add_argument("--debug", action="store_true")python main.py --debugargs.debug == True没写就是 False。
sys.argv是命令行参数(脚本名称是 sys.argv[0] )
configparser 模块
- 配置文件解析模块
config.ini
[database]host = localhostport = 3306user = rootpassword = 123456
[server]debug = truetimeout = 30configparser.ConfigParser.items()
基本用法:
import configparser
config = configparser.ConfigParser()config.read("config.ini", encoding="utf-8")
print(config.sections()) # 所有 sectionprint(config["database"]["host"]) # 取值(字符串)print(config.get("database", "port"))urllib.request模块
urllib.request 是 python 自带的最基础网络库
from urllib.request import urlopen
url = "http://www.baidu.com"
resp = urlopen(url)
with open("msg.txt","wb") as f: f.write(resp.read())
print(resp.read())解码:
print(resp.read().decode("utf-8"))requests模块
- 首个爬虫程序
import requests
url = "http://baidu.com"
resp = requests.get(url)resp.encoding = "utf-8"print(resp.text)- 使用
get请求
import requests
content = input('请输入你要检索的内容:')url = f"https://sogou.com/web?query={content}"
headers = { "User-Agent": "Mozilla/5.0 (Windows NT 10.0; Win64; x64) AppleWebKit/537.36 (KHTML, like Gecko) Chrome/145.0.0.0 Safari/537.36"}resp = requests.get(url, headers=headers)resp.encoding = "utf-8"print(resp.text)- 很多参数的
get请求
import requests
url = "https://movie.douban.com/j/chart/top_list"
data = { "type": "13", "interval_id": "100:90", "action": "", "start": "0", "limit": "20"}
headers = { "User-Agent": "Mozilla/5.0 (Windows NT 10.0; Win64; x64) AppleWebKit/537.36 (KHTML, like Gecko) Chrome/145.0.0.0 Safari/537.36"}
resp = requests.get(url,params=data,headers=headers)print(resp.text)- 使用
post请求
import requests
url = "https://fanyi.baidu.com/sug"data = { "kw": input("请输入一个单词:")
}
resp = requests.post(url, data=data)print(resp.json()["data"]) # 返回字典session
自动保存 Cookie,自动带上之前的 Cookie,复用连接(更快),统一管理 headers、params、auth 等
import requests
session = requests.Session()
# 登录session.post("https://xxx.com/login", data={ "user": "a", "pwd": "123"})
# 已经是“登录态”resp = session.get("https://xxx.com/profile")print(resp.text)mount是requests.Session里一个比较高级但非常有用的接口,主要用于:“给不同协议或不同域名,绑定不同的“连接适配器(HTTPAdapter)”
常见用法:
- 给 http / https 设置重试策略
from requests import Sessionfrom requests.adapters import HTTPAdapter
s = Session()s.mount("http://", HTTPAdapter(max_retries=3))s.mount("https://", HTTPAdapter(max_retries=3))
s.get("https://example.com")- 只对某个域名生效
s.mount("https://api.example.com", HTTPAdapter(max_retries=10))- 控制连接池大小(进阶)
adapter = HTTPAdapter( pool_connections=10, pool_maxsize=20, max_retries=5)
s.mount("https://", adapter)参数含义:
pool_connections:连接池数量pool_maxsize:每个池最多多少连接max_retries:重试次数
proxies代理
import requests
url="http://baidu.com"
#代理proxy={ "http": "xxx", "https": "xxx"}resp = requests.get(url,proxies=proxy)resp.encoding="utf-8"print(resp.text)timeout
timeout用来限制:请求最多等多久;如果超过这个时间还没成功,就直接抛异常,不再傻等。
bs4模块
pip install lxml- 基本使用方式
import requestsfrom bs4 import BeautifulSoup
url = "https://example.com"
html = requests.get(url).textsoup = BeautifulSoup(html, "lxml")获取标签、获取文本
soup.h1 #soup.find("h1")soup.h1.text #soup.h1.stringfind和find_all(找所有)
soup.find("p", class_="text")| 方法 | 功能 | 返回值 | 找不到时 |
|---|---|---|---|
soup.find(name, attrs, ...) | 查找第一个匹配的标签 | 单个 Tag对象 | None |
soup.find_all(name, attrs, ...) | 查找所有匹配的标签 | 包含 Tag对象的 list | 空列表 [] |
进阶:使用CSS选择器
soup.select('selector'):返回所有匹配元素的列表。soup.select_one('selector'):返回第一个匹配的单个元素
文本提取:
| 方法 | 说明 | 示例 |
|---|---|---|
tag.get_text() | 获取所有内部文本(包括子孙),可传分隔符 | tag.get_text(strip=True) |
.string | 仅当标签内部只有一个文本节点时有效,否则为 None | <p>Hello</p>可以得到 'Hello' |
.strings | 生成器,返回所有子孙文本节点 | 适合处理混杂标签与文本 |
.stripped_strings | 同 .strings,但自动去除空白 | 最常用于抽取纯文本列表 |
pathlib
如果这篇文章对你有帮助,欢迎分享给更多人!
部分信息可能已经过时